Onboarding Users to DataHub
New user accounts can be provisioned on DataHub in 3 ways:
- Shared Invite Links
- Single Sign-On using OpenID Connect
- Static Credential Configuration File (Self-Hosted Only)
The first option is the easiest to get started with. The second is recommended for deploying DataHub in production. The third should be reserved for special circumstances where access must be closely monitored and controlled, and is only relevant for Self-Hosted instances.
Shared Invite Links
Generating an Invite Link
If you have the Manage User Credentials Platform Privilege, you can invite new users to DataHub by sharing an invite link.
To do so, navigate to the Users & Groups section inside of Settings page. Here you can generate a shareable invite link by clicking the Invite Users button. If you
do not have the correct privileges to invite users, this button will be disabled.

To invite new users, simply share the link with others inside your organization.
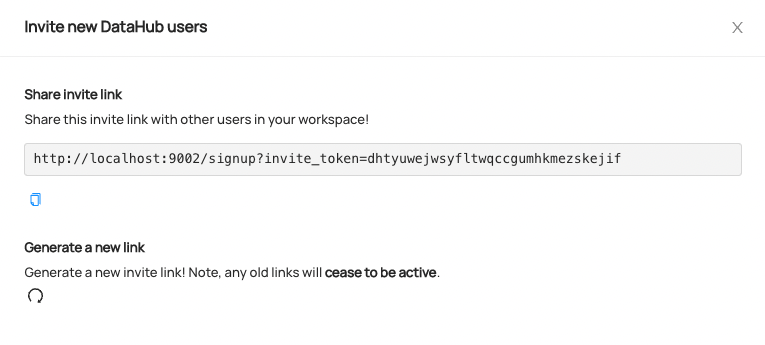
When a new user visits the link, they will be directed to a sign up screen where they can create their DataHub account.
Resetting User Passwords
To reset a user's password, navigate to the Users & Groups tab, find the user who needs their password reset,
and click Reset user password inside the menu dropdown on the right hand side. Note that a user must have the
Manage User Credentials Platform Privilege in order to reset passwords.

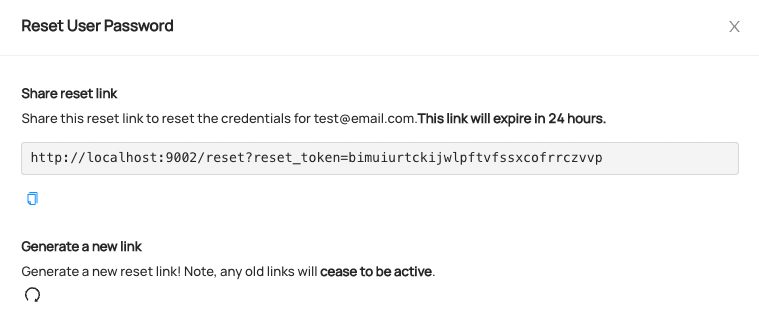
To reset the password, simply share the password reset link with the user who needs to change their password. Password reset links expire after 24 hours.
Configuring Single Sign-On with OpenID Connect
Setting up Single Sign-On via OpenID Connect enables your organization's users to login to DataHub via a central Identity Provider such as
- Azure AD
- Okta
- Keycloak
- Ping!
- Google Identity
and many more.
This option is strongly recommended for production deployments of DataHub.
DataHub Cloud
Single Sign-On can be configured and enabled by navigating to Settings > SSO > OIDC. Note that a user must have the Manage Platform Settings Platform Privilege in order to configure SSO settings.
To complete the integration, you'll need the following:
- Client ID - A unique identifier for your application with the identity provider
- Client Secret - A shared secret to use for exchange between you and your identity provider
- Discovery URL - A URL where the OpenID settings for your identity provider can be discovered.
These values can be obtained from your Identity Provider by following Step 1 on the OpenID Connect Authentication) Guide.
Self-Hosted DataHub
For information about configuring Self-Hosted DataHub to use OpenID Connect (OIDC) to perform authentication, check out OIDC Authentication.
A note about user URNs: User URNs are unique identifiers for users on DataHub. The username received from an Identity Provider when a user logs into DataHub via OIDC is used to construct a unique identifier for the user on DataHub. The urn is computed as:
urn:li:corpuser:<extracted-username>By default, the email address will be the username extracted from the Identity Provider. For information about customizing the claim should be treated as the username in Datahub, check out the OIDC Authentication documentation.
Static Credential Configuration File (Self-Hosted Only)
User credentials can be managed via a JaaS Authentication configuration file containing static username and password combinations. By default, the credentials for the root 'datahub' users are configured using this mechanism. It is highly recommended that admins change or remove the default credentials for this user
Adding new users using a user.props file
:::NOTE
Adding users via the user.props will require disabling existence checks on GMS using the METADATA_SERVICE_AUTH_ENFORCE_EXISTENCE_ENABLED=false environment variable or using the API to enable the user prior to login.
The directions below demonstrate using the API to enable the user.
:::
To define a set of username / password combinations that should be allowed to log in to DataHub (in addition to the root 'datahub' user),
create a new file called user.props at the file path ${HOME}/.datahub/plugins/frontend/auth/user.props within the datahub-frontend-react container
or pod.
This file should contain username:password specifications, with one on each line. For example, to create 2 new users, with usernames "janesmith" and "johndoe", we would define the following file:
// custom user.props
janesmith:janespassword
johndoe:johnspassword
In order to enable the user access with the credential defined in user.props, set the status aspect on the user with an Admin user. This can be done using an API call or via the OpenAPI UI interface.
- OpenAPI
Example enabling login for the janesmith user from the example above. Make sure to update the example with your access token.
curl -X 'POST' \
  'http://localhost:9002/openapi/v3/entity/corpuser/urn%3Ali%3Acorpuser%3Ajanesmith/status?async=false&systemMetadata=false&createIfEntityNotExists=false&createIfNotExists=true' \
  -H 'accept: application/json' \
  -H 'Content-Type: application/json' \
  -H 'Authorization: Bearer <access token>' \
  -d '{
  "value": {
    "removed": false
  }
}'
Once you've saved the file, simply start the DataHub containers & navigate to http://localhost:9002/login
to verify that your new credentials work.
To change or remove existing login credentials, edit and save the user.props file. Then restart DataHub containers.
If you want to customize the location of the user.props file, or if you're deploying DataHub via Helm, proceed to Step 2.
(Advanced) Mount custom user.props file to container
This step is only required when mounting custom credentials into a Kubernetes pod (e.g. Helm) or if you want to change
the default filesystem location from which DataHub mounts a custom user.props file (${HOME}/.datahub/plugins/frontend/auth/user.props).
If you are deploying with datahub docker quickstart, or running using Docker Compose, you can most likely skip this step.
Docker Compose
You'll need to modify the docker-compose.yml file to mount a container volume mapping your custom user.props to the standard location inside the container
(/etc/datahub/plugins/frontend/auth/user.props).
For example, to mount a user.props file that is stored on my local filesystem at /tmp/datahub/user.props, we'd modify the YAML for the
datahub-web-react config to look like the following:
  datahub-frontend-react:
    build:
      context: ../
      dockerfile: docker/datahub-frontend/Dockerfile
    image: acryldata/datahub-frontend-react:${DATAHUB_VERSION:-head}
    .....
    # The new stuff
    volumes:
      - ${HOME}/.datahub/plugins:/etc/datahub/plugins
      - /tmp/datahub:/etc/datahub/plugins/frontend/auth
Once you've made this change, restarting DataHub enable authentication for the configured users.
Helm
You'll need to create a Kubernetes secret, then mount the file as a volume to the datahub-frontend pod.
First, create a secret from your local user.props file
kubectl create secret generic datahub-users-secret --from-file=user.props=./<path-to-your-user.props>
Then, configure your values.yaml to add the volume to the datahub-frontend container.
datahub-frontend:
  ...
  extraVolumes:
    - name: datahub-users
      secret:
        defaultMode: 0444
        secretName:  datahub-users-secret
  extraVolumeMounts:
    - name: datahub-users
      mountPath: /etc/datahub/plugins/frontend/auth/user.props
      subPath: user.props
Note that if you update the secret you will need to restart the datahub-frontend pods so the changes are reflected. To update the secret in-place you can run something like this.
kubectl create secret generic datahub-users-secret --from-file=user.props=./<path-to-your-user.props> -o yaml --dry-run=client | kubectl apply -f -
A note on user URNs: User URNs are unique identifiers for users of DataHub. The usernames defined in the
user.propsfile will be used to generate the DataHub user "urn", which uniquely identifies the user on DataHub. The urn is computed asurn:li:corpuser:{username}, where "username is defined inside your user.props file."
Changing the default 'datahub' user credentials (Recommended)
Please refer to Changing the default user credentials.
Caveats
Adding User Details
If you add a new username / password to the user.props file, no other information about the user will exist
about the user in DataHub (full name, email, bio, etc). This means that you will not be able to search to find the user.
In order for the user to become searchable, simply navigate to the new user's profile page (top-right corner) and click Edit Profile. Add some details like a display name, an email, and more. Then click Save. Now you should be able to find the user via search.
You can also use our Python Emitter SDK to produce custom information about the new user via the CorpUser metadata entity.
For a more comprehensive overview of how users & groups are managed within DataHub, check out this video.
FAQ
- Can I enable OIDC and username / password (JaaS) authentication at the same time?
YES! If you have not explicitly disabled JaaS via an environment variable on the datahub-frontend container (AUTH_JAAS_ENABLED),
then you can always access the standard login flow at http://your-datahub-url.com/login.
Feedback / Questions / Concerns
We want to hear from you! For any inquiries, including Feedback, Questions, or Concerns, reach out on Slack!
